In this article, we are going to create a REST API-based Spring Boot application to demonstrate the use of Spring Boot 3, Spring Security 6, and the latest version of JWT. The app will have a login endpoint which accepts username/password for login and generates a JWT based token after a successful authentication. The login process will be role based and configurable in the database. We will be using MYSQL database and Spring JPA for this demo application to read all user related infos and only authorised user will be able to access the secured REST APIs.
Project Structure
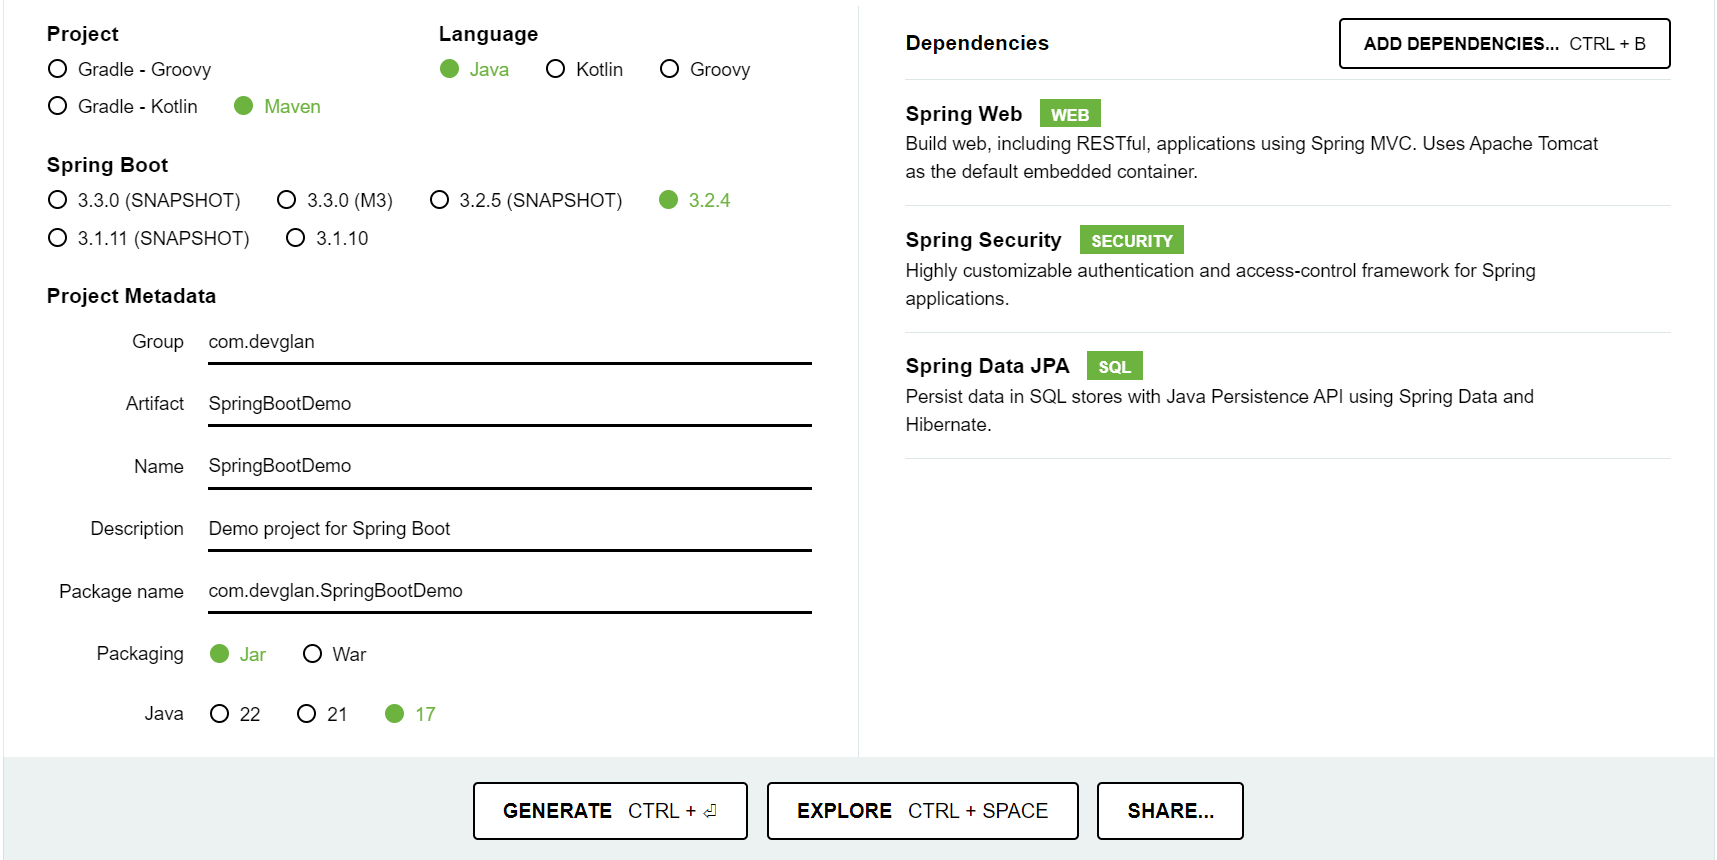
The initial project structure is generated from https://start.spring.io by selecting maven based Spring Boot version as 3.2.4 and Java 17.
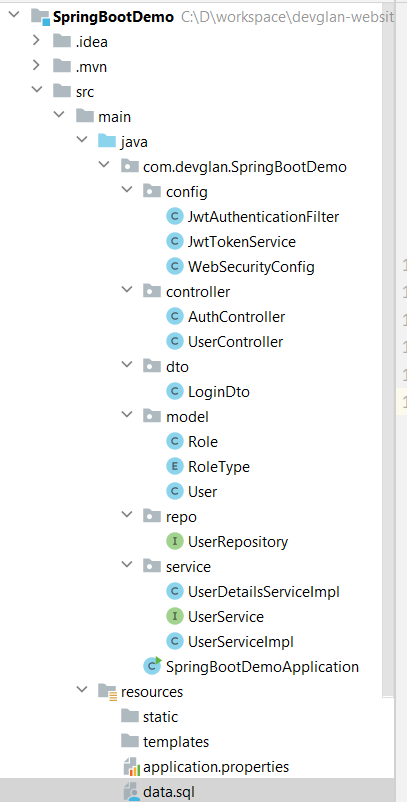
The project structure has a classic Spring Boot project structure where we have all security related configuration in config package and corresponding packages for controller, service, model classes implementation. The MYSQL configuration resides in application.proprties file.
Maven Dependencies
Below are the other maven dependencies that were added manually for MySQL connector 8, JWT 0.12 and Lombok 1.18
<dependency>
	<groupId>mysql</groupId>
	<artifactId>mysql-connector-java</artifactId>
	<version>8.0.33</version>
</dependency>
<dependency>
	<groupId>io.jsonwebtoken</groupId>
	<artifactId>jjwt</artifactId>
	<version>0.12.5</version>
</dependency>
<dependency>
	<groupId>org.projectlombok</groupId>
	<artifactId>lombok</artifactId>
	<version>1.18.32</version>
	<scope>provided</scope>
</dependency>
Model Class Implementation
Mainly, there are 2 model classes - User.java and Role.java. User and Role entity classes have Many to Many relationship.
User.java@Data @Entity @Table(name = "users") public class User { @Id @GeneratedValue(strategy= GenerationType.AUTO) private long id; @Column private String username; @Column private String name; @Column private String email; @Column @JsonIgnore private String password; @ManyToMany(fetch = FetchType.EAGER, cascade = CascadeType.ALL) @JoinTable(name = "user_role", joinColumns = { @JoinColumn(name = "user_id") }, inverseJoinColumns = { @JoinColumn(name = "role_id") }) private Set<Role> roles; }Role.java
@Data
@Entity
@Table(name = "roles")
public class Role {

    @Id
    @GeneratedValue(strategy= GenerationType.AUTO)
    private long id;

    @Enumerated(EnumType.STRING)
    @Column(name ="role_name", unique = true)
    private RoleType role;

    @Column(name = "description")
    private String description;
}
We have defined user role to be of Enum type.
public enum RoleType {
    USER("ROLE_USER"),
    ADMIN("ROLE_ADMIN");

    private String value;

    RoleType(String value) {
        this.value = value;
    }

    public String getValue() {
        return this.value;
    }
}
Next, we have a LoginDto.java defined to hold the username/password during login API call.
@Data
public class LoginDto {

    private String username;
    private String password;;
}
Spring Controller Implementation
Now, let us see the APIs that we are exposing to create this sample example app. There are 2 APIs developed here - one is for login which doesn't require any authentication for access whereas we have another API in UserController.java which is a secured API.
@RestController
@RequestMapping("/auth")
public class AuthController {

    @Autowired
    private UserService userService;

    @PostMapping("/login")
    public ResponseEntity<String> login(@RequestBody LoginDto loginDto) {
        return ResponseEntity.ok(userService.login(loginDto));
    }
}
UserController.java
@RestController
@RequestMapping("/user")
public class UserController {

    @Autowired
    private UserService userService;

    @GetMapping
    public ResponseEntity<User> userProfile() {
        return ResponseEntity.ok(userService.getUser());
    }
}
Service and JPA Repository Class Implementation
Let's create a simple service and repository class to run the Spring Boot app. Then we can add security to the APIs exposed.
The service and repository class implementations are basic implementation and self explainatory. Let me know in the comment section if you have any questions regarding this.
UserRepository.javapublic interface UserRepository extends JpaRepository<User, Long> { User findByUsername(String username); }
We will discuss about all the injected dependencies such as bcryptEncoder, jwtTokenService and authenticationProvider later in the article.
The login() method here utilises Spring Securty's UsernamePasswordAuthenticationToken to authenticate the user from the DB based on the AuthenticationProvider that we have configured in the WebSecurityConfig.java whereas the getUser() method is called to fetch the user from DB post authentication.
a JWT token will be generated on a successful authentication.
UserServiceImpl.java@Service(value = "userService") public class UserServiceImpl implements UserService { @Autowired private BCryptPasswordEncoder bcryptEncoder; @Autowired private UserRepository userRepository; @Autowired private JwtTokenService jwtTokenService; @Autowired private AuthenticationProvider authenticationProvider; @Override public String login(LoginDto loginDto) { final Authentication authentication = authenticationProvider.authenticate( new UsernamePasswordAuthenticationToken( loginDto.getUsername(), loginDto.getPassword() ) ); SecurityContextHolder.getContext().setAuthentication(authentication); final User user = userRepository.findByUsername(loginDto.getUsername()); return jwtTokenService.generateToken(user.getUsername(), user.getRoles()); } @Override public User getUser() { UserDetails userDetails = (UserDetails) SecurityContextHolder.getContext().getAuthentication().getPrincipal(); return userRepository.findByUsername(userDetails.getUsername()); }
Below is the entry in application.properties file for datasource configuration.
spring.application.name=springbootdemo
server.port=8080
server.servlet.context-path=/spring-boot-demo
spring.datasource.url=jdbc:mysql://localhost:3306/test
spring.datasource.username=root
spring.datasource.password=root
Spring Security 6 Configuration
As per Spring Security 6, we need to define a Bean of type SecurityFilterChain which is responsible for all the security related configuration for any Spring Boot application. Here in this filterChain() method, we are asking Spring Security to disable cors() and csrf(), secure all APIs except those which are whitelised and we plugged in our custom filter before Spring provided UsernamePasswordAuthenticationFilter to validae the token and set the security context.
Also, we have configured the BCryptPasswordEncoder meaning we have our password Bcrypt encrypted and saved to DB and we are asking Spring to use the encryption mechanism while matching the password.
Here is an online free tool to generate Bcrypt password.
WebSecurityConfig.java@Configuration @EnableWebSecurity @EnableMethodSecurity public class WebSecurityConfig { private static final String[] WHITELIST_URLS = {"/auth/**"}; @Autowired private UserDetailsService userDetailsService; @Autowired private JwtAuthenticationFilter jwtAuthFilter; @Bean public SecurityFilterChain filterChain(HttpSecurity http) throws Exception { http .cors(AbstractHttpConfigurer::disable) .csrf(AbstractHttpConfigurer::disable) .authorizeHttpRequests(auth -> { auth.requestMatchers(WHITELIST_URLS).permitAll().anyRequest().authenticated(); }) .sessionManagement(session -> session.sessionCreationPolicy(SessionCreationPolicy.STATELESS)) .addFilterBefore(jwtAuthFilter, UsernamePasswordAuthenticationFilter.class); return http.build(); } @Bean AuthenticationProvider authenticationProvider() { DaoAuthenticationProvider provider = new DaoAuthenticationProvider(); provider.setUserDetailsService(userDetailsService); provider.setPasswordEncoder(passwordEncoder()); return provider; } @Bean public BCryptPasswordEncoder passwordEncoder(){ return new BCryptPasswordEncoder(); } }
Now, let us define our UserDetailsServiceImpl which is injected in WebSecurityConfig.java. The method loadUserByUsername() is used by Spring Security to do a lookup into the DB to find the user based on username.
@Component
public class UserDetailsServiceImpl implements UserDetailsService {

    @Autowired
    private UserRepository userRepository;

    public UserDetails loadUserByUsername(String username) throws UsernameNotFoundException {
        User user = userRepository.findByUsername(username);
        if(user == null){
            throw new UsernameNotFoundException("Invalid username or password.");
        }
        return new org.springframework.security.core.userdetails.User(user.getUsername(), user.getPassword(), getAuthority(user.getRoles()));
    }

    private List<SimpleGrantedAuthority> getAuthority(Set<Role> roles) {
        return roles.stream().map(role -> new SimpleGrantedAuthority(role.getRole().getValue())).collect(Collectors.toUnmodifiableList());
    }
}
So far we are preety much done with the implementation. Let us provide the implementation for JwtAuthenticationFilter which is called once for every request. Here we have the implementation to decrypt the JWT token from the request header and set the Spring Security context. The authorisation header looks like something like this.

@Configuration
public class JwtAuthenticationFilter extends OncePerRequestFilter {

    @Autowired
    private UserDetailsService userDetailsService;

    @Autowired
    private JwtTokenService jwtTokenService;

    private static final String TOKEN_PREFIX = "Bearer ";
    private static final String HEADER_STRING = "Authorization";

    @Override
    protected void doFilterInternal(HttpServletRequest req, HttpServletResponse res, FilterChain chain) throws IOException, ServletException {
        String header = req.getHeader(HEADER_STRING);
        String username = null;
        if (header != null && header.startsWith(TOKEN_PREFIX)) {
            String authToken = header.replace(TOKEN_PREFIX,"");
            username = jwtTokenService.extractUsernameFromToken(authToken);
        } else {
            logger.warn("couldn't find bearer string, will ignore the header");
        }
        if (StringUtils.hasText(username)) {
            UserDetails userDetails = userDetailsService.loadUserByUsername(username);
            UsernamePasswordAuthenticationToken authentication = new UsernamePasswordAuthenticationToken(userDetails, null, userDetails.getAuthorities());
            authentication.setDetails(new WebAuthenticationDetailsSource().buildDetails(req));
            logger.info("authenticated user " + username + ", setting security context");
            SecurityContextHolder.getContext().setAuthentication(authentication);
        }
        chain.doFilter(req, res);
    }
}
Integrating JWT with Spring Security 6
In order to integrate JWT with Spring Security, we require a mechanism to generate a JWT token which will have username, roles and expiry time encrypted together with a strong pass phrase. Below is an utility class which has all the methods defined to perform these operations.
JwtTokenService.java@Component public class JwtTokenService { private String secretKey = "NllmZHptNVVrNG9RRUs3NllmZHptNVVrNG9RRUs3NllmZHptNVVrNG9RRUs3NllmZHptNVVrNG9RRUs3NllmZHptNVVrNG9RRUs3NllmZHptNVVrNG9RRUs3NllmZHptNVVrNG9RRUs3Nl"; private static final long ACCESS_TOKEN_VALIDITY_SECONDS = 5*60*60; public String generateToken(String username, Set<Role> authorities) { return Jwts.builder().subject(username) .claim("roles", authorities)//can also set a map .issuedAt(new Date(System.currentTimeMillis())) .expiration(new Date(System.currentTimeMillis() + ACCESS_TOKEN_VALIDITY_SECONDS * 1000)) .issuer("https://www.devglan.com") .signWith(getSecretKey(), SignatureAlgorithm.HS512) .compact(); } public String extractUsernameFromToken(String token) { if (isTokenExpired(token)) { return null; } return getClaims(token, Claims::getSubject); } public <T> T getClaims(String token, Function<Claims, T> resolver) { return resolver.apply(Jwts.parser().verifyWith(getSecretKey()).build().parseSignedClaims(token).getPayload()); } public boolean isTokenExpired(String token) { Date expiration = getClaims(token, Claims::getExpiration); return expiration.before(new Date()); } private SecretKey getSecretKey() { byte[] keyBytes = Decoders.BASE64.decode(secretKey); return Keys.hmacShaKeyFor(keyBytes); } }
Here we are using the HS512 as Signature Algorithm to generate the JWT token.
Testing the App
We can run the SpringBootDemoApplication.java as a Java application and we have our in-memeory tomcat starts running on port 8080 as per configuration in application.properties.
create table roles (id bigint not null, description varchar(255), role_name enum ('USER','ADMIN'), primary key (id)) engine=InnoDB;
create table roles_seq (next_val bigint) engine=InnoDB;
insert into roles_seq values ( 1 );
create table user_role (user_id bigint not null, role_id bigint not null, primary key (user_id, role_id)) engine=InnoDB;
create table users (id bigint not null, email varchar(255), name varchar(255), password varchar(255), username varchar(255),
primary key (id)) engine=InnoDB;
create table users_seq (next_val bigint) engine=InnoDB;
insert into users_seq values ( 1 );
alter table roles drop index UK_716hgxp60ym1lifrdgp67xt5k;
alter table roles add constraint UK_716hgxp60ym1lifrdgp67xt5k unique (role_name);
alter table user_role add constraint FKt7e7djp752sqn6w22i6ocqy6q foreign key (role_id) references roles (id);
//123456
INSERT INTO users (id, email, name, password, username) values (1,'john@devglan.com', 'John Doe', '$2a$12$Ro2fUZMlItSSn0YFI2d6fujc3HbFYp2adNc47ZlQKOM7os1rTozJW', 'johndoe123');
INSERT INTO roles(id, description, role_name) values(1, 'User role', 'USER');
INSERT INTO user_role (user_id, role_id) values (1, 1);
@SpringBootApplication
public class SpringBootDemoApplication {

	public static void main(String[] args) {
		SpringApplication.run(SpringBootDemoApplication.class, args);
	}

}
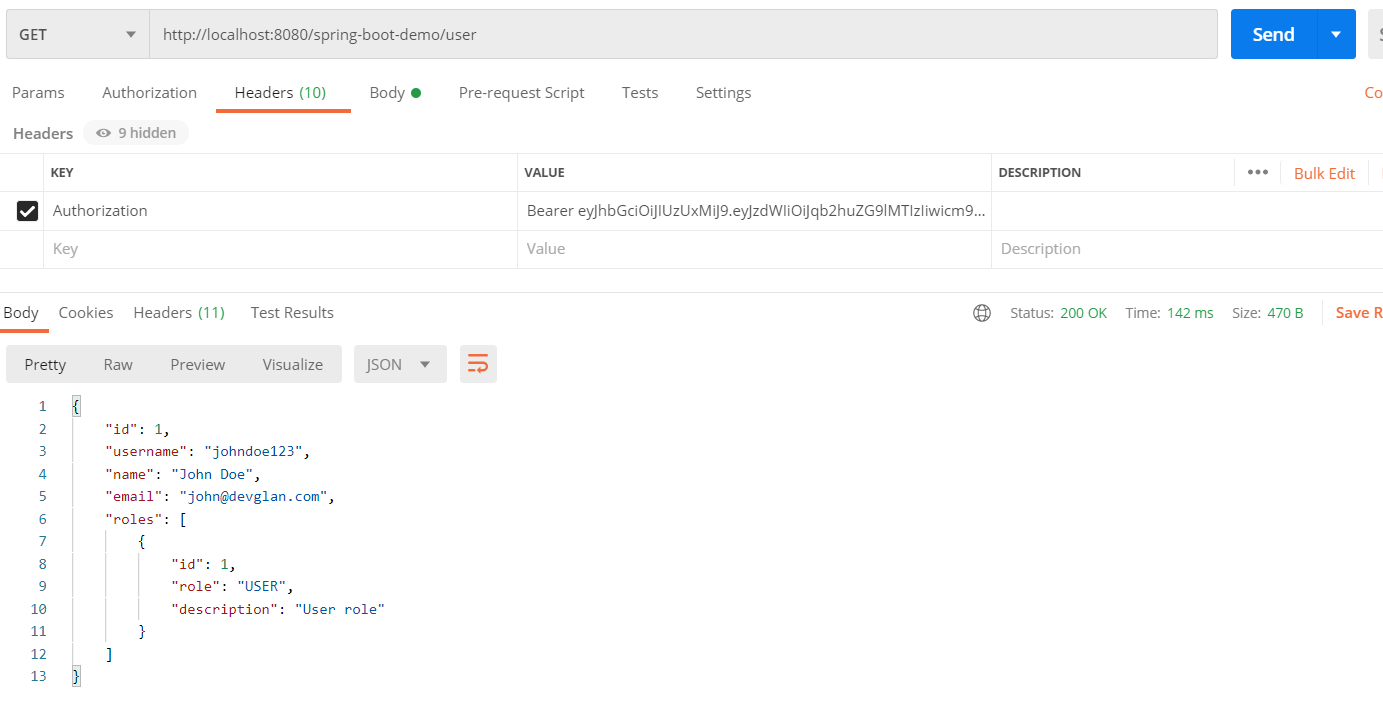
Below are the API details executed on Postman.
Login API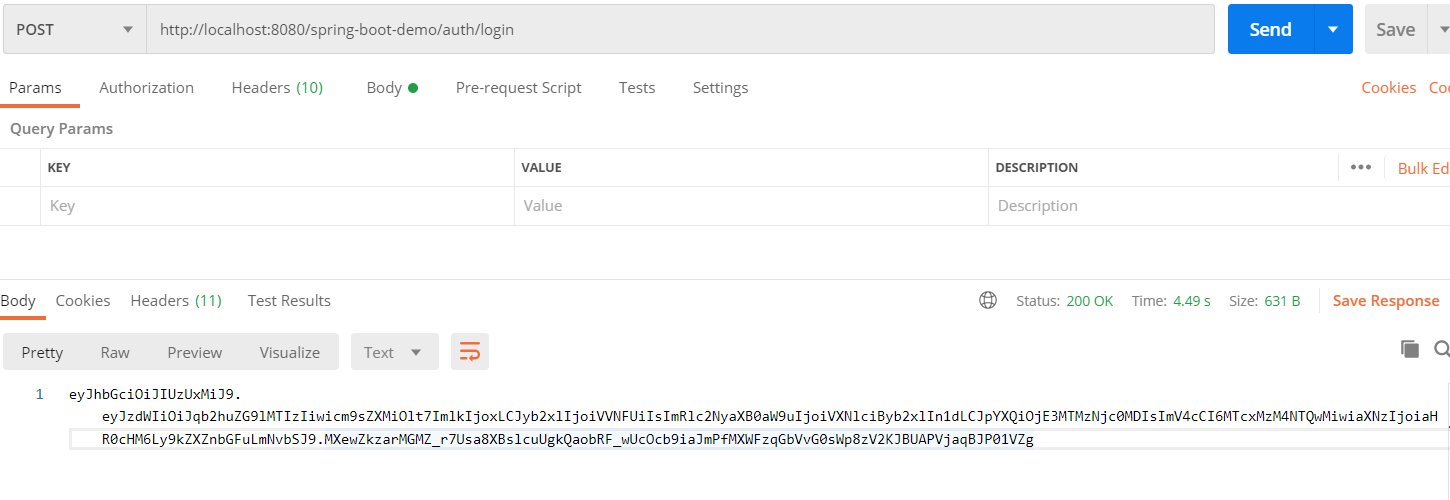 Get User API
Conclusion
In this tutorial, we developed REST APIs using Spring Boot 3 and Spring Security and secured the API using JWT library token.


