In any web app, security has always been a great concern. Today, we will be securing our Spring MVC app using Spring Security login form feature.To build this application we will be using Spring boot to build it and hence we will have a complete javaconfig.We will also take care of protecting the app against Cross Site Request Forgery (CSRF) attacks (Detail here). Now let us build our login app. If the credentials provided in the login form is valid, then user will be redirected to next page. If not an error message will be displayed.
Environment Setup
1. JDK 8 2. Spring Boot 3. Intellij Idea/ eclipse 4. MavenMaven Dependencies
spring-boot-starter-parent: provides useful Maven defaults. It also provides a dependency-management section so that you can omit version tags for existing dependencies.
spring-boot-starter-web: includes all the dependencies required to create a web app. This will avoid lining up different spring common project versions.
spring-boot-starter-tomcat: enable an embedded Apache Tomcat 7 instance, by default. We have overriden this by defining our version. This can be also marked as provided if you wish to deploy the war to any other standalone tomcat.
tomcat-embed-jasper: provides support for .jsp file rendering.
spring-boot-starter-security: take care of all the required dependencies related to spring security.
    <properties>
        <tomcat.version>8.0.3</tomcat.version>
		<start-class>spring-boot-example.Application</start-class>
    </properties>

	<parent>
        <groupId>org.springframework.boot</groupId>
        <artifactId>spring-boot-starter-parent</artifactId>
        <version>1.3.3.RELEASE</version>
    </parent>

    <dependencies>
		<dependency>
            <groupId>org.springframework.boot</groupId>
            <artifactId>spring-boot-starter-web</artifactId>
        </dependency>
		<dependency>
            <groupId>org.springframework.boot</groupId>
            <artifactId>spring-boot-starter-tomcat</artifactId>
			<!--<scope>provided</scope>-->
        </dependency>
		<dependency>
            <groupId>org.springframework.boot</groupId>
            <artifactId>spring-boot-starter-security</artifactId>
		</dependency>
		<dependency>
            <groupId>javax.servlet</groupId>
            <artifactId>jstl</artifactId>
		</dependency>
		<dependency>
            <groupId>org.apache.tomcat.embed</groupId>
            <artifactId>tomcat-embed-jasper</artifactId>
			<!--<scope>provided</scope>-->
		</dependency>

    </dependencies>
Spring Bean Configuration
SpringBootServletInitializer enables process used in Servlet 3.0 using web.xml
@SpringBootApplication: This is a convenience annotation that is equivalent to declaring @Configuration, @EnableAutoConfiguration and @ComponentScan.
package com.developerstack.config; import org.springframework.boot.SpringApplication; import org.springframework.boot.context.web.SpringBootServletInitializer; import org.springframework.context.annotation.ComponentScan; import org.springframework.boot.autoconfigure.SpringBootApplication; @ComponentScan(basePackages = "com.developerstack") @SpringBootApplication public class Application extends SpringBootServletInitializer { private static ClassapplicationClass = Application.class; public static void main(String[] args) { SpringApplication.run(Application.class, args); } }
By default Spring Boot will serve static content from a directory called /static (or /public or /resources or /META-INF/resources) in the classpath or from the root of the ServletContext. But here we have defined out custom folder structure for static contents, hence it is required to tell Spring boot about how to render static content.
package com.developerstack.config;

import org.springframework.context.annotation.Bean;
import org.springframework.context.annotation.Configuration;
import org.springframework.web.servlet.config.annotation.ResourceHandlerRegistry;
import org.springframework.web.servlet.config.annotation.ViewControllerRegistry;
import org.springframework.web.servlet.config.annotation.WebMvcConfigurerAdapter;
import org.springframework.web.servlet.view.InternalResourceViewResolver;
import org.springframework.web.servlet.view.JstlView;

@Configuration
public class WebConfig extends WebMvcConfigurerAdapter {

    @Override
    public void addResourceHandlers(final ResourceHandlerRegistry registry) {
        registry.addResourceHandler("/*.js/**").addResourceLocations("/ui/static/");
        registry.addResourceHandler("/*.css/**").addResourceLocations("/ui/static/");
    }

    @Override
    public void addViewControllers(ViewControllerRegistry registry) {
        registry.addViewController("/").setViewName("login");
        registry.addViewController("/login").setViewName("login");
    }

    @Bean
    public InternalResourceViewResolver setupViewResolver()  {
        InternalResourceViewResolver resolver =  new InternalResourceViewResolver();
        resolver.setPrefix ("/ui/jsp/");
        resolver.setSuffix (".jsp");
        resolver.setViewClass (JstlView.class);
        return resolver;
    }

}
 Other Interesting Posts
AES Encryption and Decryption in Java
Spring Security Password Encoding using Bcrypt Encoder
Spring Boot Security Redirect after Login with complete JavaConfig
Spring Security Hibernate Example with complete JavaConfig
Securing REST API with Spring Security Basic Authentication
Spring JMS Activemq Integration with Spring Boot
Websocket spring Boot Integration without STOMP with complete JavaConfig
Maintaining Spring Session during Websocket Connection
Spring MVC Angularjs Integration with complete JavaConfig
Spring Hibernate Integration with complete JavaConfig
Spring Junit Integration with complete JavaConfig
Spring Ehcache Cacheable Example with complete javaConfig
Spring Boot Thymeleaf Example
Now let us define our main configuration for spring security - SpringSecurityConfig.java.class is annotated with @EnableWebSecurity to enable Spring Security web security support. we have extended WebSecurityConfigurerAdapter to override spring features with our custom requirements. Here we are permitting all users to have access to login and logout urls but only authorised users having role as USER should be allowed to view the dashboard page. In the mean time, we have also made configuration to secure our authentication process with CSRF attack.
package com.developerstack.config;

import org.springframework.beans.factory.annotation.Autowired;
import org.springframework.context.annotation.Configuration;
import org.springframework.security.config.annotation.authentication.builders.AuthenticationManagerBuilder;
import org.springframework.security.config.annotation.web.builders.HttpSecurity;
import org.springframework.security.config.annotation.web.builders.WebSecurity;
import org.springframework.security.config.annotation.web.configuration.EnableWebSecurity;
import org.springframework.security.config.annotation.web.configuration.WebSecurityConfigurerAdapter;
import org.springframework.security.web.util.matcher.AntPathRequestMatcher;

@Configuration
@EnableWebSecurity
public class SpringSecurityConfig extends WebSecurityConfigurerAdapter {
	@Override
	protected void configure(HttpSecurity http) throws Exception {
		http.csrf().requireCsrfProtectionMatcher(new AntPathRequestMatcher("**/login")).and().authorizeRequests()
				.antMatchers("/dashboard").hasRole("USER").and().formLogin().defaultSuccessUrl("/dashboard")
				.loginPage("/login").and().logout().permitAll();
	}

	@Autowired
	public void configureGlobal(AuthenticationManagerBuilder auth) throws Exception {
		auth.inMemoryAuthentication().withUser("john123").password("password").roles("USER");
	}

	@Override
	public void configure(WebSecurity web) throws Exception {
		web.ignoring().antMatchers("/*.css");
		web.ignoring().antMatchers("/*.js");
	}
}
Our controller class is exactly similar to controller which we defined in this article. This controller is responsible to render dashboard page with user details as a model object.
Client Side
Now let us define our login.jsp.Here we have placed a hidden input type with name="${_csrf.parameterName}" and value="${_csrf.token}" which will protect the application against Cross Site Request Forgery (CSRF) attacks.
<%@ taglib prefix="c" uri="http://java.sun.com/jsp/jstl/core" %>
<html>
<head>
    <title>Spring Security Example</title>
<link href="/bootstrap.min.css" rel="stylesheet">
    <script src="/jquery-2.2.1.min.js"></script>
    <script src="/bootstrap.min.js"></script>
</head>
<body>
	<div class="container" style="margin:50px">
		<h3>Spring Security Login Example</h3>
		<c:if test="${param.error ne null}">
			<div style="color: red">Invalid credentials.</div>
		</c:if>
		<form action="/login" method="post">
			<div class="form-group">
				<label for="username">UserName: <input type="text"
					class="form-control" id="username" name="username">
			</div>
			<div class="form-group">
				<label for="pwd">Password:</label> <input type="password"
					class="form-control" id="pwd" name="password">
			</div>

			<button type="submit" class="btn btn-success">Submit</button>

			<input type="hidden" name="${_csrf.parameterName}"
				value="${_csrf.token}" />
		</form>
	</div>
</body>
</html>
Following is the dashboard.jsp which will be rendered on successful login. It has also a hidden input type with name="${_csrf.parameterName}" and value="${_csrf.token}" to protect the application against Cross Site Request Forgery (CSRF) attacks.
<%@ taglib prefix="c" uri="http://java.sun.com/jsp/jstl/core" %>
<html>
<head>
    <title>Spring Security Example</title>
<link href="/bootstrap.min.css" rel="stylesheet">
    <script src="/jquery-2.2.1.min.js"></script>
    <script src="/bootstrap.min.js"></script>
</head>
<body>
<div>
<div class="container" style="margin:50px;border: 1px solid green;">
	<div>
		<form action="/logout" method="post">
			<button type="submit" class="btn btn-danger">Log Out</button>
			<input type="hidden" name="${_csrf.parameterName}"
				   value="${_csrf.token}"/>
		</form>
    </div>
    <div class="row text-center"><strong> User Details</strong></div>
    <div class="row" style="border:1px solid green;padding:10px">
        <div class="col-md-4 text-center"><strong>Name</strong></div>
        <div class="col-md-4 text-center"><strong>Email</strong></div>
        <div class="col-md-4 text-center"><strong>Address</strong></div>
    </div>
        <c:forEach var="user" items="${users}">
            <div class="row" style="border:1px solid green;padding:10px">
            <div class="col-md-4 text-center">${user.name}</div>
            <div class="col-md-4 text-center" >${user.email}</div>
                <div class="col-md-4 text-center">${user.address}</div>
            </div>
        </c:forEach>

</div>
</div>
</body>
</html>
Run Application
1. Run Application.java as a java application.
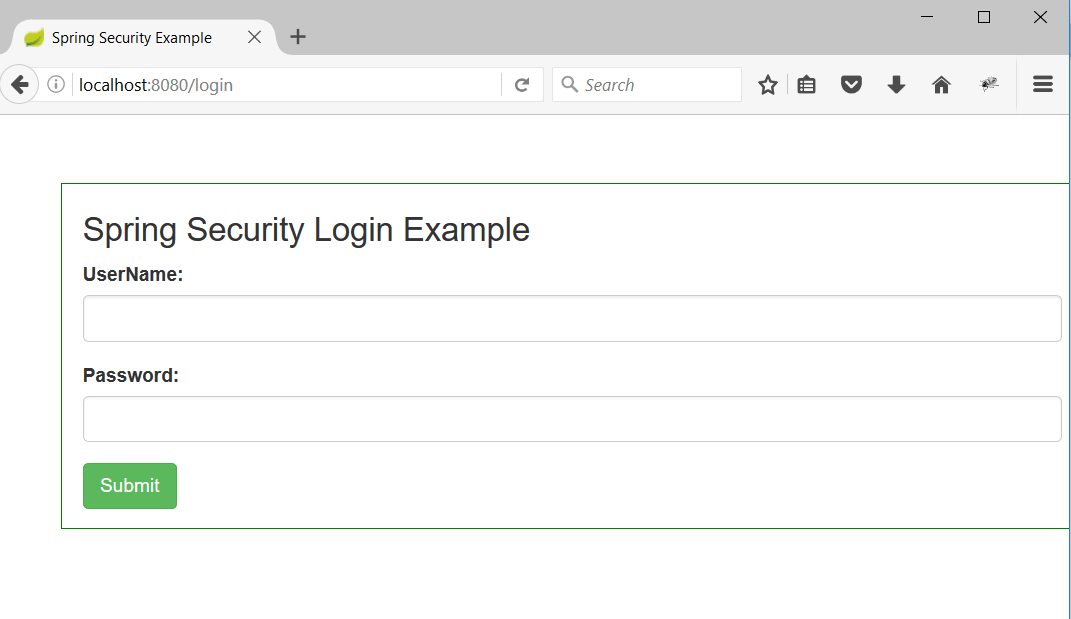
2. Hit the url as http://localhost:8080/dashboard but since the user is not authorised yet, user will be redirected to /login as below:

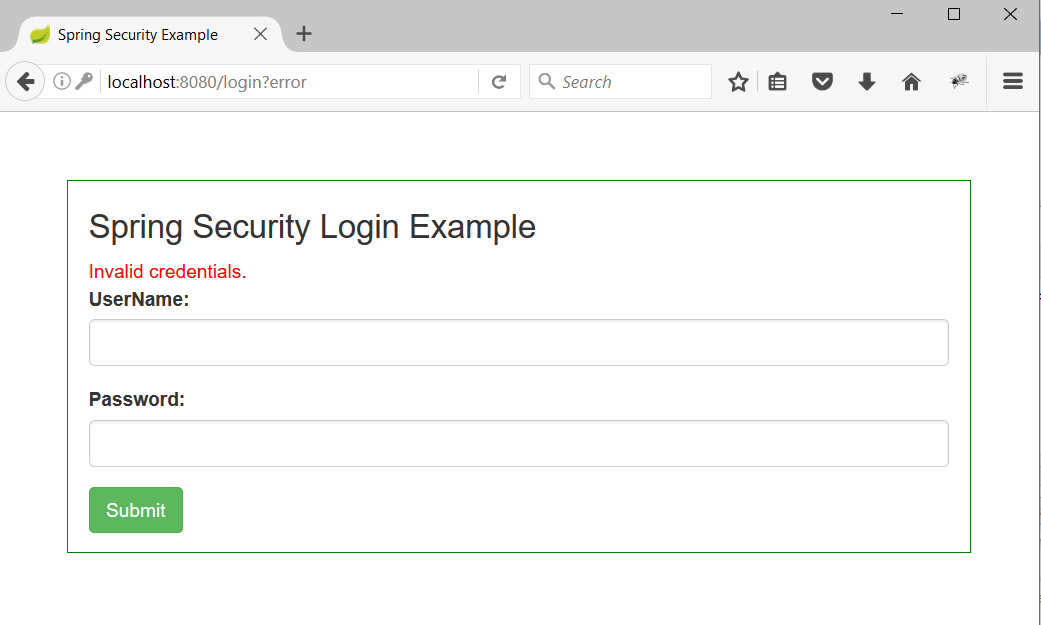
3. Now enter any wrong credentials and we can see an error message as follow. This proves our authentication mechanism is working.

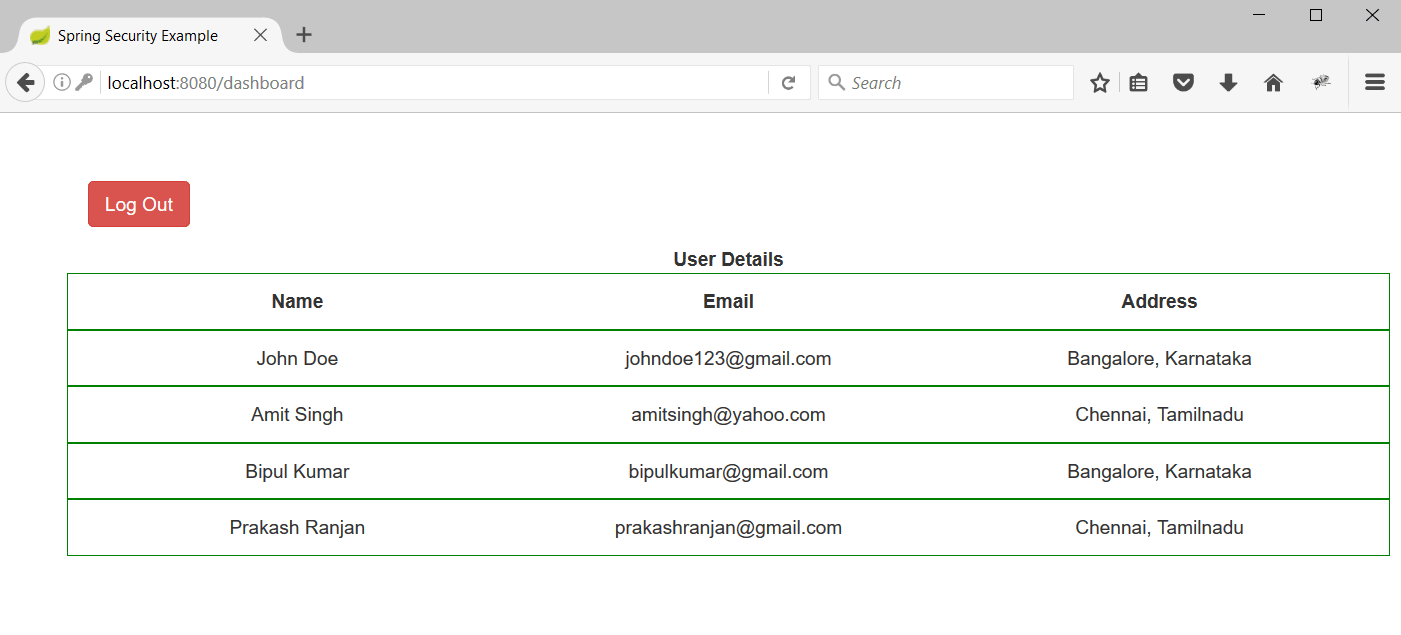
4. Enter the username/password as john123/password and hit enter the dashboard page will be rendered.

5. Here we can see a logout button, once clicked the user will be successfuly logged out and redirected to the login page.
Conclusion
I hope this article served you that you were looking for. If you have anything that you want to add or share then please share it below in the comment section.


