As we know Thymeleaf has all the capabilities and even more than of traditional JSP.Today let us discuss about what is Thymeleaf, why Thymeleaf is required and also about how to integrate Thymeleaf with Spring Boot with a simple example.
What is Thymeleaf?
As per wiki, Thymeleaf is a Java XML/XHTML/HTML5 template engine that can work both in web (Servlet-based) and non-web environments. It is better suited for serving XHTML/HTML5 at the view layer of MVC-based web applications, but it can process any XML file even in offline environments. In web applications Thymeleaf aims to be a complete substitute for JSP, and implements the concept of Natural Templates: template files that can be directly opened in browsers and that still display correctly as web pages.
Why Thymeleaf?
ThymeLeaf is a healthy open source project: new features coming up each month, good documentation, responsive user forums… Though JSP is more or less like HTML but it is not completely compatible with HTML like Thymeleaf. Thymeleaf template file will open and display normally in a browser, while a JSP file does not. Thymeleaf has also support for variable expressions (${...}) like Spring EL and execute on model attributes, asterisk expressions (*{...}) execute on the form backing bean, hash expressions (#{...}) are for internationalization and link expressions (@{...}) rewrite URLs. Unlike JSPs, Thymeleaf works well for Rich HTML emails.
Spring Boot and Thymeleaf integration
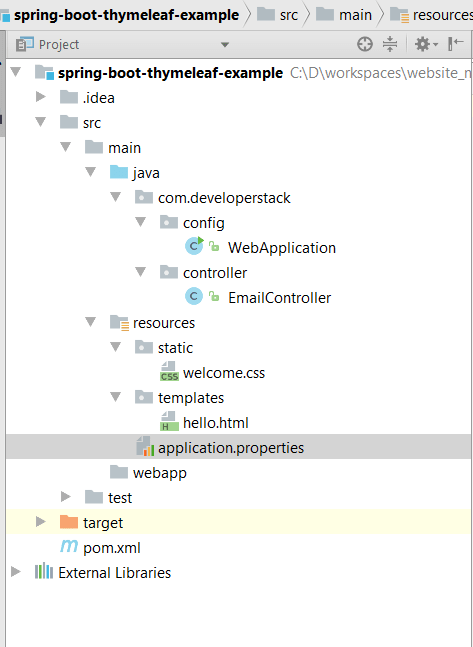
Spring boot has some default configurations and settings provided for Thymeleaf. Hence, it has made very simple to integrate Thymeleaf to integrate with spring boot. Let us see how we can integrate Thymeleaf with Spring Boot using a simple example. Following will be our project structure.

Maven Dependencies
By including spring-boot-starter-thymeleaf in our pom file, Spring boot provides required Thymeleaf template engine to us. Also, it provides some default stati file location configurations. e.g. Spring Boot configures the Thymeleaf template engine to read template files from /resources/templates.
<?xml version="1.0" encoding="UTF-8"?>
<project xmlns="http://maven.apache.org/POM/4.0.0" xmlns:xsi="http://www.w3.org/2001/XMLSchema-instance"
    xsi:schemaLocation="http://maven.apache.org/POM/4.0.0 http://maven.apache.org/xsd/maven-4.0.0.xsd">
    <modelVersion>4.0.0</modelVersion>

    <groupId>com.developerstack</groupId>
    <artifactId>spring-boot-thymeleaf-example</artifactId>
    <version>0.1.0</version>

    <properties>
        <java.version>1.7</tjava.version>
    </properties>

	<parent>
        <groupId>org.springframework.boot</groupId>
        <artifactId>spring-boot-starter-parent</artifactId>
        <version>1.3.5.RELEASE</version>
    </parent>

    <dependencies>
		<dependency>
            <groupId>org.springframework.boot</groupId>
            <artifactId>spring-boot-starter-thymeleaf</artifactId>
        </dependency>

    </dependencies>

	<build>
        <plugins>
           <plugin>
                <groupId>org.springframework.boot</groupId>
            <artifactId>spring-boot-starter-thymeleaf</artifactId>
            </plugin>
        </plugins>
    </build>
</project>
Spring Bean Configuration
@SpringBootApplication annotation is equivalent to using @Configuration, @EnableAutoConfiguration and @ComponentScan with their default attributes:
package com.developerstack.config; import org.springframework.boot.SpringApplication; import org.springframework.boot.builder.SpringApplicationBuilder; import org.springframework.boot.context.web.SpringBootServletInitializer; importorg.springframework.boot.autoconfigure.SpringBootApplication; @SpringBootApplication public class Application extends SpringBootServletInitializer { private static ClassapplicationClass = Application.class; public static void main(String[] args) { SpringApplication.run(Application.class, args); } @Override protected SpringApplicationBuilder configure(SpringApplicationBuilder application) { return application.sources(applicationClass); } }
 Other Interesting Posts
Spring 5 Features and Enhancements
Spring Boot Spring MVC Example
Spring MVC Angularjs Integration with complete JavaConfig
Spring Hibernate Integration with complete JavaConfig
Spring Junit Integration with complete JavaConfig
Spring Ehcache Cacheable Example with complete javaConfig
Spring Boot Security Redirect after Login with complete JavaConfig
Spring Security Hibernate Example with complete JavaConfig
Securing REST API with Spring Security Basic Authentication
Spring Security Password Encoding using Bcrypt Encoder
Spring Boot Security Custom Form Login Example
Spring JMS Activemq Integration with Spring Boot
Websocket spring Boot Integration Without STOMP with complete JavaConfig
Maintaining Spring Session during Websocket Connection
Now let us define our controller that will serve the response to the client.
EmailController.javapackage com.developerstack.controller; import java.util.Arrays; import java.util.List; import org.springframework.stereotype.Controller; import org.springframework.web.bind.annotation.RequestMapping; import org.springframework.web.bind.annotation.RequestMethod; import org.springframework.web.servlet.ModelAndView; @Controller public class EmailController { @RequestMapping(value = "/email", method = RequestMethod.GET) public ModelAndView hello(@RequestParam(value = "id", required = false, defaultValue = "123") Integer id) { ModelAndView model = new ModelAndView(); model.addObject("email", getEmail(id)); model.setViewName("hello"); return model; } private String getEmail(int id) { switch (id) { case 123: return "dhiraj123@gmail.com"; case 345: return "amit345@yahoo.co.in"; default: return "default@test.com"; } }
Client Side
At client side we have simple .html and cs files. Spring Boot will automatically serves static resources from the path /resources/static. So, following is the configuration about how we can achieve sering static content in spring boot.
hello.html<!DOCTYPE html> <html lang="en" xmlns:th="http://www.thymeleaf.org"> <head> <meta charset="UTF-8"/> <link href="../static/welcome.css" th:href="@{/welcome.css}" rel="stylesheet" media="screen"/> <title>Hello Thymeleaf!</title> </head> <body> Your email address is <span th:text=" ${email} + '!'"> </body> </html>dashboard.css
body {
	color: red;
}
Run Application
1. Run Application.java as a java application.
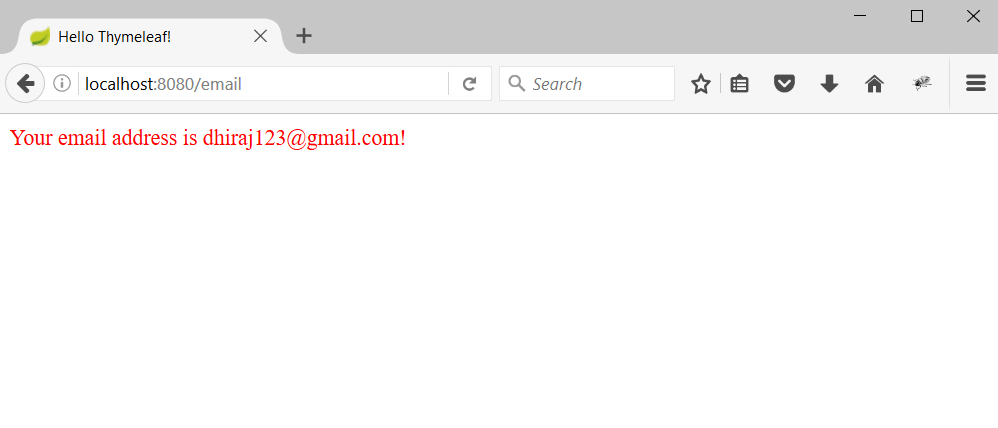
2. Open browser and hit url http://localhost:8080/email?id=123
3. Based on the id passed, email address wll be displayed as below:

Conclusion
I hope this article served you that you were looking for. If you have anything that you want to add or share then please share it below in the comment section.


